
The question I keep getting in my DMs is some version of: “Do I really need to spend $50-80 on a countertop garden just to grow basil?” And the answer is no. You can grow herbs on your kitchen counter with mason jars, some net cups, seeds, and a bottle of nutrients for about $15 total. It’s called the Kratky method, it uses zero electricity, and it works embarrassingly well for how simple it is.
I put off trying Kratky for maybe a year because it seemed too bare-bones to be real. No pump, no timer, no grow light (if you have a decent window). Just a jar of nutrient water with a plant sitting on top. But I finally set up three jars of basil, mint, and parsley sometime last fall, mostly because I was annoyed at buying $4 clamshells of herbs that went limp in the fridge after three days. Those jars are still producing.
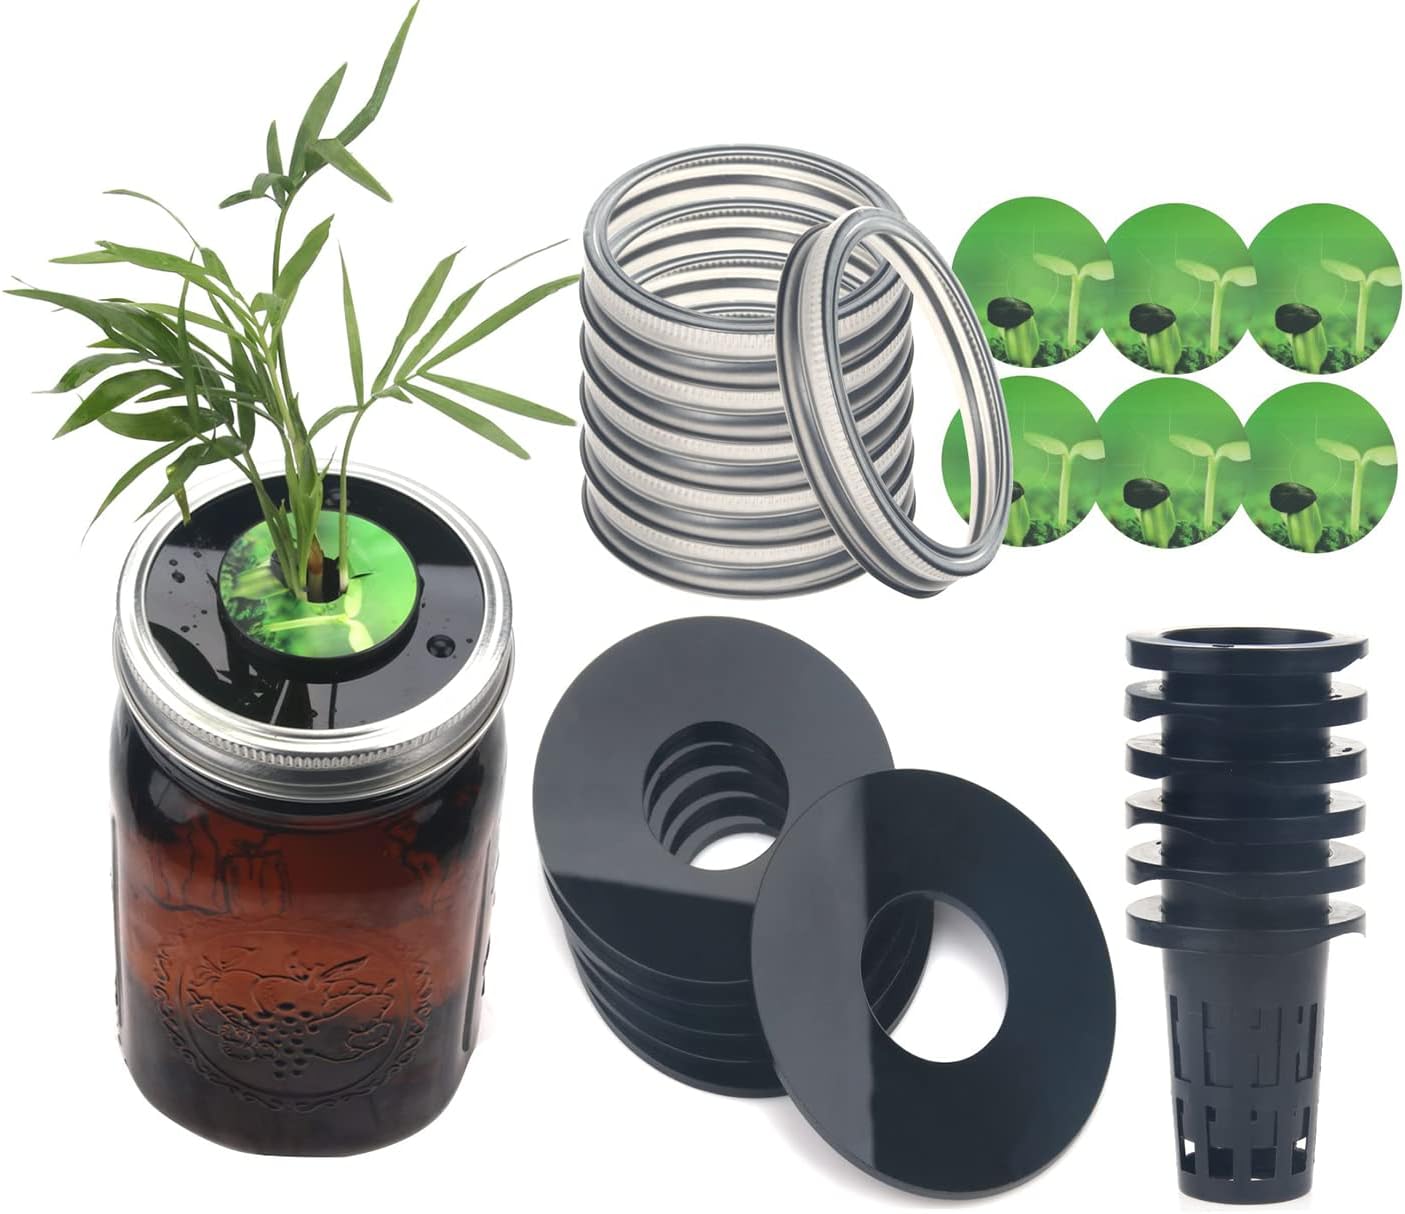
Quick Answer: The Kratky method is passive hydroponics in a jar: no pump, no electricity, no moving parts. You put a net cup with a seedling into a mason jar full of nutrient solution, and the plant does the rest. A 3-jar countertop herb setup costs roughly $14-18 to start. Basil, mint, parsley, and chives all do great. It’s the cheapest way to get into hydroponics, and March is the perfect time to start since you can also use Kratky jars to get transplants ready for outdoor gardens.
| Product | Price | Rating | Key Feature | |
|---|---|---|---|---|
 ORIMERC 12 Pack 3 inch Net Cups Pots ORIMERC 12 Pack 3 inch Net Cups Pots | ~$7.73 | 4.6★ (1,529) | 12 pcs Net Pots, 12 feet self-watering capillary wick cord, and 12 pcs plant lab | Check Price |
 Kratky Lid Wide Mouth Hydroponic Lid Kratky Lid Wide Mouth Hydroponic Lid | ~$9.99 | 4.2★ (41) | Kratky Lid Wide Mouth Hydroponic Lid Kratky Mason Jar Lid Urban Aquaculture Krat | Check Price |
 Cz Garden Supply 25 Pack - 3 inch Round Cz Garden Supply 25 Pack - 3 inch Round | 4.3★ (101) | 25 - HEAVY DUTY Net Pots | Check Price | |
 12pcs Kratky Wide Mouth Hydroponic 12pcs Kratky Wide Mouth Hydroponic | ~$16.99 | 4.4★ (461) | Kratky lids are made of high quality acrylic material, sturdy and reusable, fits | Check Price |
How Kratky Actually Works (30-Second Version)
I’m not going to give you a full science lecture on this because I’d get half of it wrong anyway. The basics: you fill a jar with water mixed with hydroponic nutrients. A net cup sits in the lid, holding your seedling in a sponge or rockwool cube. The bottom of the net cup touches the water. As the plant drinks and the water level drops, an air gap forms between the water surface and the net cup. The roots that are in that air gap absorb oxygen. The roots still dangling in the water absorb nutrients. That’s it. The plant regulates itself.
No pump. No air stone. No timer. No electricity at all if you have a sunny window.
The thing that took me a while to trust is that you basically set it up and walk away. I kept wanting to check on it, adjust things, top off the water early. You don’t need to. The air gap is the whole point. If you keep topping it off so the roots are always submerged, you’ll drown the plant. I learned that the hard way with my first mint jar, which I kept babying until the roots turned to brown mush.
What You Need (Full Parts List)
Here’s exactly what I bought for a 3-jar setup:
Jars: 3 wide-mouth quart mason jars from the dollar store. $1 each, so $3 total. You want wide-mouth specifically because the net cups and lids are sized for that opening. You can also use pint jars for smaller herbs like chives, but quart gives you more nutrient solution to work with, which means less topping off.
Net cups or Kratky lids: This is where you have a couple options. I started with the ORIMERC 12-pack net cups buy on Amazon , which run about $7.73 for 12 cups plus wicks and labels. They’re 3-inch cups, sturdy, and they fit wide-mouth mason jars fine. You get way more than you need for a 3-jar setup, which is good because you’ll want to expand. Customers say they’re solid for the price, and I agree.
If you want a more self-contained kit, the Kratky Lid Wide Mouth set check current price comes with 6 lids, 6 baskets, replacement rings, and labels for about $10. These are designed specifically as mason jar lid inserts so there’s less fiddling. I will say the reviews mention the baskets run small, and one complaint is that what you get doesn’t always match the listing photos, so set your expectations at “functional, not pretty.” They work. But they’re not premium.
One more option if you just want solid net cups and nothing else: the Cz Garden Supply 25-pack see on Amazon gives you a ridiculous quantity of heavy-duty 3-inch net cups. Good if you’re planning to scale up or you already have lids.
Growing medium: You need something to hold the seed or seedling in the net cup. Rockwool cubes or hydroponic grow sponges, roughly $0.10-0.30 each in bulk packs. A pack of 50 costs maybe $6-8 and lasts forever. I’ve also used small pieces of sponge cut from a regular kitchen sponge (not the ones with soap in them, obviously), which works in a pinch but isn’t ideal because they can get funky.
Nutrients: A small bottle of General Hydroponics FloraSeries or even leftover AeroGarden liquid nutrients. A few ml per quart jar. One $8-10 bottle will last you a year of countertop growing, easily. I’ve written about AeroGarden nutrient alternatives that work for Kratky too, since it’s the same basic chemistry.
Seeds: A $2-3 packet of basil, mint, parsley, or whatever you want. I buy mine from the hardware store seed rack, nothing fancy.
Total for 3 jars, first time: roughly $14-18 depending on which net cups you pick and whether you already have mason jars. Subsequent grows cost almost nothing since you reuse everything except the sponge and seeds.
Step by Step Setup
I’m going to walk through exactly what I do, including the parts where I messed up the first time so you don’t have to.
1. Prep the jars. Fill each quart mason jar with water, leaving about an inch of space at the top. Mix in nutrients according to the bottle directions, but honestly, use half strength to start. I’ve had yellowing leaves with General Hydroponics Flora Series at full strength, and quarter-dose has been my sweet spot for basil specifically. For a quart jar, that’s maybe 1-2 ml of nutrient solution total. Tiny amounts.
2. Block the light. This is the step people skip and then they get a jar full of green algae slime two weeks later. Any light hitting the nutrient solution will cause algae to bloom. Wrap the jar in aluminum foil, paint it, use a sock over it, whatever. Some of the Kratky lid kits come with blackout sleeves, like the 12-piece set with blackout sleeves check price on Amazon , which is convenient if you don’t want to mess with foil. I use foil because I already have it and I’m cheap.
3. Set up the net cup. Put a rockwool cube or grow sponge in the net cup. If you’re starting from seed, drop 2-3 seeds into the sponge, poke them down about a quarter inch, and keep the sponge moist (I mist it with a spray bottle). If you’re transplanting a seedling you already started, rinse the soil off the roots gently and tuck it into the sponge. I’ve done both. Seedlings transplant fine.
4. Place it and forget about it. Set the net cup in the jar lid so the bottom of the cup just touches the water surface. Put the jar on a windowsill that gets at least 5-6 hours of sun. South-facing is best. And then leave it alone for a while.
The hard part is the leaving it alone part.
What to Grow (and What to Skip)
Basil is the obvious first pick and it’s my favorite Kratky herb because it grows fast enough that you feel like something is happening within the first week. Mint is almost unkillable, which makes it a great confidence builder. Parsley works fine. I don’t have anything interesting to say about parsley. It grows. It’s fine. Chives and cilantro both do well too, though cilantro bolts fast in warm weather, which is annoying but not a Kratky-specific problem.
Skip rosemary and lavender. They’re slow, fussy about pH, and they want conditions that are hard to maintain in a jar on your counter. I tried rosemary once and gave up after two months of basically nothing happening.
And don’t try to grow full-size tomatoes in a quart mason jar. The roots will outgrow the container in a few weeks and you’ll have a mess. If you want to grow cherry tomatoes indoors , use an actual hydroponic system with a pump and a bigger reservoir.
One jar per herb variety. Don’t mix basil and mint in the same jar thinking you’ll save space, because they have different nutrient appetites and one will bully the other.
Kratky vs. a $50 Mufga: When Does Each Make Sense?
This is the real question for most of my readers, so here’s how I think about it:
| Kratky Mason Jar | Mufga 18-Pod System | |
|---|---|---|
| Cost | $14-18 to start | ~$50-60 + nutrients |
| Electricity | None | Yes (LED, pump, timer) |
| Light source | Your window | Built-in LED panel |
| Capacity | 1-6 jars (your call) | 18 pods |
| Best for | Herbs, lettuce | Herbs, lettuce, small peppers |
| Maintenance | Top off water occasionally | Refill reservoir, replace pods |
| Low-light apartments? | No. Needs a sunny window. | Yes. That’s the whole point of the LED. |
| Noise | Silent | Slight pump hum |
My take: if you have a south-facing kitchen window and you mainly want basil, mint, and parsley, Kratky is the move. You’re spending one-fourth the money and getting the same herbs. The Mufga wins if your apartment is dim (mine is, which is why I still use one), or if you want to grow more variety year-round without worrying about seasonal light. I covered the countertop hydro garden comparison in another post if you want the full rundown on those systems.
But Kratky is the better starting point for someone who’s never grown anything and just wants to see if they even like this hobby before committing real money to it. Fifteen bucks and a window. That’s all you’re risking.
The March Timing Thing
Starting Kratky jars right now is a two-for-one deal. You get countertop herbs for cooking through March and April, and if you have any outdoor garden space, those same seedlings can go outside after your last frost date. I’ve moved Kratky basil seedlings into outdoor pots in May and they transitioned fine, maybe a day or two of looking droopy before perking back up. So even if you decide Kratky isn’t your permanent setup, you haven’t wasted anything because those plants can keep growing outside.
I think there’s something nice about having a visual on the windowsill in March too, when everything outside still looks dead. My partner, who complains about my grow light setup literally every time I turn it on, has never once complained about the mason jars. They’re small, they’re quiet (obviously, since there’s nothing to make noise), and they don’t blast purple light across the living room at 11pm. I should probably write about apartment-friendly setups specifically at some point, because the light situation is a whole thing in small spaces. For now, if you want background on that, I wrote about grow lights for countertop herb gardens already.
Common Mistakes I Made So You Don’t Have To
Topping off too often. I said this already but I’m saying it again because you’re going to do it anyway. The air gap is supposed to form. Let the water level drop. If your plant looks healthy, the water level is fine.
Skipping the light-blocking step. Algae city. Looks gross, smells worse, and it competes with your plant for nutrients. Wrap the jar. Foil takes 30 seconds.
Using tap water without thinking about it. My tap water has a pH around 7.8, which is too high for most herbs. I add a tiny splash of pH Down (or even just white vinegar in a pinch) to get it closer to 6.0-6.5. I spent three weeks once blaming seed pods for poor germination when it was just my water being too alkaline the entire time. If you’ve dealt with similar problems in pod-based systems, I covered why AeroGarden plants keep dying and a lot of the same troubleshooting applies here.
Starting with too many jars. Start with three. See if it clicks. You’ll know within two weeks whether you want to scale up to six or eight jars, or whether you’d rather go back to a powered system. The beauty of Kratky is that scaling costs almost nothing since you already have the nutrients and extra net cups.
This article is part of my Countertop Hydroponic Systems: Complete Comparison , a complete resource for countertop hydroponic growing.
Frequently Asked Questions
Do I need a grow light for Kratky herbs?
Not if you have a window that gets 5-6 hours of direct sun. South-facing is ideal, west-facing can work in summer. If your windowsill gets less than that, or if it’s a north-facing window, you’ll get leggy, sad plants and you’re better off with a system that has a built-in LED. Kratky plus a cheap clip-on grow light is also an option, but at that point you’re adding electricity and cost back into the equation, which kind of defeats the purpose.
How often do I change the water?
You don’t change it on a schedule. You top it off when the level gets low (I check once a week, takes five seconds to peek). Fill it back up to just below the net cup, not all the way. Every 4-6 weeks I’ll dump the jar entirely, clean it, and refill with fresh nutrient solution, but honestly that cadence is approximate. I forget sometimes and it still works.
Can I grow lettuce with Kratky?
Yes, and lettuce is actually one of the best Kratky crops. Butterhead varieties do especially well. But you’ll want a bigger container than a quart jar for lettuce since it drinks a lot of water. A half-gallon or gallon jar works better. I might do a separate post on Kratky lettuce at some point because there are some specific things about tip burn and light that are worth getting into.
What nutrients should I use?
General Hydroponics FloraSeries (the three-bottle set) is the standard recommendation and it works. I use it at quarter strength for herbs, which I know sounds extreme but full strength burns basil leaves fast. If you already have AeroGarden liquid nutrients sitting around from a previous system, those work too. Same basic mix of nitrogen, phosphorus, potassium.
Will the roots outgrow a mason jar?
For herbs, generally no. Basil and mint will fill the jar with roots over a few months, but by then you’ve harvested plenty and can restart. If you’re growing something bigger, yes, you’ll need a bigger container. Stick to herbs and small lettuce for mason jar Kratky and you’ll be fine.
That’s the whole thing. No electricity, no apps, no proprietary pods, no subscription. Just jars on a windowsill. I still use my powered systems for year-round growing in my dim apartment, but Kratky is what I recommend to anyone who asks me where to start. The worst case scenario is you’re out fifteen bucks and you have some mason jars you can use for actual canning.