
My first pod of basil rotted in the sponge before it ever sprouted. Dry sponge, bright lights from day one, dome off too early. I didn’t know any of those things were wrong until the smell told me. These are exactly the kind of hydroponic garden beginner mistakes that nobody warns you about until it’s too late.
Four years and a lot of dead pods later, I can trace almost every failure I’ve had back to one of nine specific mistakes. None of them are complicated. All of them got me anyway. And the frustrating part is that most of them cost me nothing to fix, I just didn’t know to look.
Quick Answer: Most countertop hydroponic garden failures happen in two windows: before anything germinates (wrong media prep, wrong light, dome off too early) and after plants are established (pH drift, nutrient concentration errors, incompatible plants sharing a reservoir). Test your tap water before your first fill, keep humidity domes on until plants hit the roof, and never dose nutrients without knowing your current EC. That’s 80% of beginner failures covered.
Act One: Germination Mistakes (Before You Have a Single Sprout)
Mistake 1: Planting Into a Dry Sponge
This one kills more first grows than anything else. The peat or coco coir sponge that came with your system looks fine dry. It isn’t. Seeds need contact with moist media to trigger germination, and a dry sponge wicks moisture away from the seed coat instead of delivering it.
I’ve seen people lose two separate transplants this way in the same week, both from wrapping seeds in bone-dry sponges. The fix is trivially easy: soak your grow media in room-temperature water for at least an hour before planting. Overnight is better. Squeeze gently to remove excess (don’t wring it), then plant. That’s the whole trick.
If you’re curious how different media types compare on moisture retention and germination rates, I wrote a full breakdown at Grow Sponges vs Rockwool vs Horticubes .
Mistake 2: Pulling the Humidity Dome Off Too Early
The little plastic domes that come with most pod systems look like an afterthought. They’re not. They trap moisture and warmth around ungerminated seeds, creating the microclimate those seeds actually need. Most beginners pop them off after a few days because nothing’s happening yet.
Nothing’s happening yet because germination takes 3-7 days for most herbs. Leave the domes on until the seedling physically touches the roof of the dome. That’s the signal it doesn’t need the humidity protection anymore. Pull them before that, and you’re gambling with evaporation.
Mistake 3: Blasting Seeds With Full Light From Day One
This one I did to myself. The instructions said to turn the light on, so I turned the light on at full intensity, right at canopy level. I got leggy, pale sprouts that looked like they were stretching for their lives. Because they were.
Seeds don’t photosynthesize before they sprout. They don’t need light to germinate at all. Leaving seeds in complete darkness for the first 2-3 days actually speeds up germination in most varieties. Once sprouts appear, lower intensity or a raised light arm matters a lot. If your system has adjustable brightness, start at the lowest setting for the first week.
The other thing that happens with full-intensity light at germination: it dries out the sponge faster, which feeds back into mistake #1.
Mistake 4: Skipping the Tap Water Check
Tap water is fine for hydroponic growing, with one important condition: you have to actually know what’s in it first.
Some growers discover their tap water has a TDS above 1,000 ppm and a pH near 9.5. At those levels, you’re not just starting from a suboptimal baseline, you’re actively poisoning your nutrient mix before plants get a chance. Chloramines, hard mineral content, extreme pH: any one of those alone can cause weeks of mystery problems that look like nutrient deficiencies but aren’t.
My own tap water sits at pH 8.7. That took me six months to discover. Every time I thought I’d fixed a yellowing basil problem, I’d just temporarily masked it. Six months of troubleshooting the wrong thing, that’s irritating in a way that’s hard to convey. The problem was in the tap, not the system, and a two-minute test on day one would have told me.
A basic TDS/EC pen is the single most under-used beginner tool. The VIVOSUN Digital pH Meter, 3-in-1 TDS/EC combo buy on Amazon (around $29 on Amazon) does pH, TDS, EC, and temperature in one unit, which is what you need before your first fill and every week after. The main complaint is that it needs recalibration more often than you’d like, so use the included buffer packs and don’t skip that step. The readings drift if you do.
🌱 Best for Beginners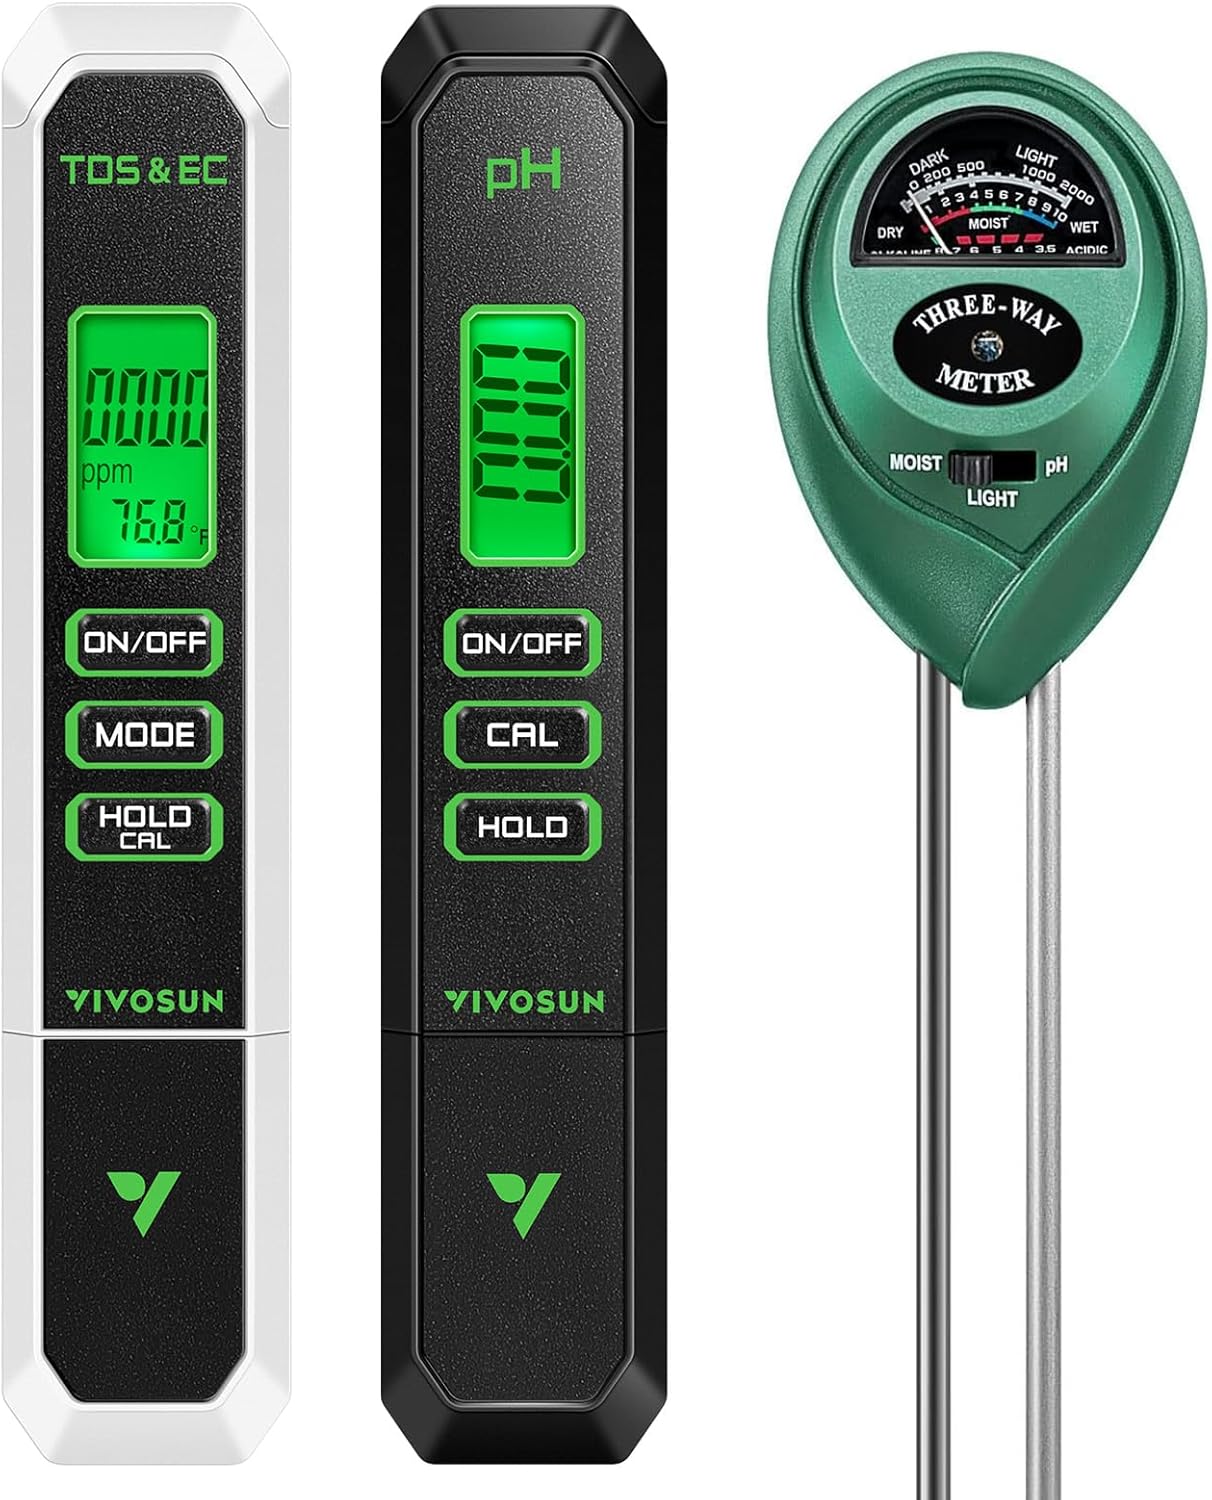 VIVOSUN Digital pH Meter, 3-in-1 TDS/EC ...
Three-in-1 testing kit measuring pH, TDS/EC, temperature, and soil moisture with ±0.1 accuracy for hydroponics and plant care.
Check Price on Amazon
VIVOSUN Digital pH Meter, 3-in-1 TDS/EC ...
Three-in-1 testing kit measuring pH, TDS/EC, temperature, and soil moisture with ±0.1 accuracy for hydroponics and plant care.
Check Price on AmazonIf you’re overwhelmed by the idea of calibrating a digital meter, the General Hydroponics pH Test Indicator check current price is a no-calibration liquid drop test. You add a few drops to a small water sample, match the color to a chart, done. It’s less precise than a digital meter, but it’ll tell you if your water is at 9.5 and saving you the mystery. I’d treat it as a starter tool while you get comfortable, then move to a digital meter once you’re a few grows in.
VIVOSUN Digital pH Meter, 3-in-1 TDS/EC ...
Three-in-1 testing kit measuring pH, TDS/EC, temperature, and soil moisture with ±0.1 accuracy for hydroponics and plant care.
~$28.99
 General Hydroponics GLCMBX0010 Flora Gro, Micro & Bloom 1 ...
Three-part hydroponic nutrient system with pH control kit for vegetative and flowering plant growth stages.
General Hydroponics GLCMBX0010 Flora Gro, Micro & Bloom 1 ...
Three-part hydroponic nutrient system with pH control kit for vegetative and flowering plant growth stages.
Act Two: Growing Mistakes (After You Have Plants)
Mistake 5: Dosing Nutrients Without Knowing Your EC
Most countertop pod systems dose nutrients on a schedule: every week or two, add X amount of nutrient solution. Simple enough. The problem is that schedule was designed for a full system running at capacity, with the assumption that plants are consuming nutrients at a predictable rate.
They’re not. Between top-offs, plants drink water faster than they consume nutrients. So EC climbs. Then you add more nutrients on schedule anyway, and EC climbs more. In a 1-1.5 gallon reservoir, this can become a real problem fast.
The reverse happens too: you top off with plain water repeatedly for a few weeks (diluting the nutrient concentration), then follow the schedule and dose a full amount on top of an already-diluted reservoir. Suddenly EC spikes 200+ ppm in a day, and plants that looked fine yesterday have brown-edged leaves tomorrow.
The fix is to measure EC before dosing, not just before adding water. If EC is already high, skip the nutrient dose and top off with plain water only. My nutrient testing article covers this in more detail if you want the numbers behind it.
Mistake 6: Ignoring pH After the First Fill
You check pH once, it’s fine, you move on. pH doesn’t stay where you set it. In most countertop systems running third-party nutrients, it drifts up over time, sometimes a full pH unit within a week.
The real cost of ignoring this: nutrients are present in the water, but plants physically cannot absorb them outside the right pH window (5.8-6.3 for most countertop crops). So you get yellowing, curling leaves that look like a nutrient deficiency. You add more nutrients. Nothing improves. Because the problem was never the nutrients.
I spent weeks diagnosing what looked like an iron deficiency before realizing I hadn’t rechecked pH in twelve days, the solution had dropped to 5.1 and I was locking out calcium the whole time. Yellowing that doesn’t respond to nutrient top-offs is almost always a pH problem, not a feeding problem.
Check pH at least twice a week once plants are established. If you’re using AeroGarden’s branded nutrients, you get some pH buffering built into the formula, which makes this more forgiving. Third-party nutrients don’t have that buffer, so pH needs more active management.
Mistake 7: Growing Tomatoes and Herbs in the Same Reservoir
This one surprises people because it seems like a convenience win: one garden, mix of plants, everything growing together. The problem is that tomatoes and herbs don’t want the same conditions.
Herbs are comfortable at EC 1.0-1.5. Tomatoes need EC 1.8-2.5, especially once flowering starts. Running a shared reservoir means either the herbs are getting too much and showing toxicity symptoms, or the tomatoes are getting too little and dropping flowers. I’ve watched this play out: tiny tomatoes failing to thrive right next to perfectly healthy basil, not because anything was wrong with the system, but because the nutrient level that made the basil happy was too low for the tomatoes.
The only real fix is separate systems. I wrote about the tomato light problem specifically , but the nutrient conflict is its own issue on top of the light issue. Tomatoes are hard in countertop systems. If it’s your first grow, start with herbs or lettuce.
Mistake 8: Not Shaking Nutrient Bottles Before Dosing
This one sounds too simple to matter. It matters.
Liquid nutrient formulas separate over time, especially single-bottle systems. The denser minerals settle toward the bottom of the bottle. If you pour directly from an un-shaken bottle, the first few doses are mostly water and the last few are heavily concentrated. That inconsistency shows up in your plants over time, and because it’s gradual, it’s hard to attribute.
Shake the bottle. Every time.
The other nutrient mistake in this category: running a half-full pod system and dosing for a full one. Some systems calculate nutrient dosing based on total pod capacity, not how many pods are actually filled. Running 4 pods in a 12-pod system and adding a full 12-pod nutrient dose can push concentration to nearly three times what those plants want. Check your system’s manual for how it calculates dose volume.
Mistake 9: Choosing the Wrong Root Rot Strategy (Or Using Two at Once)
Root rot is the most common growth killer in warm kitchens. Water above 75°F accelerates the bacteria responsible, and most apartment kitchens run warm. White fuzzy growth on roots is usually the first sign. Brown, slimy roots that smell like a pond are next.
There are two approaches: sterile (hydrogen peroxide, roughly 1 tsp of 3% per gallon, clears the water and kills everything in it) or beneficials (Hydroguard or similar beneficial bacteria that outcompete the rot organisms). Both work. The mistake is using both at the same time. H2O2 kills beneficial bacteria. If you add Hydroguard and then dose with H2O2 a few days later because you’re still worried, you’ve just killed everything Hydroguard was doing. Pick one approach and stick to it.
I’ve got a full article on algae and green water that covers the root zone environment in more detail.
Before Your First Fill: 4-Step Quick Check
Do these before you ever add water to a new system. They take about 10 minutes and prevent the majority of first-grow failures:
- Test your tap water. TDS below 400 ppm and pH between 6.5-7.5 means you’re fine to use as-is. Above those thresholds, get a filter or use distilled water with a CalMag supplement.
- Pre-wet your grow media. Soak sponges or rockwool in room-temperature water for at least an hour before planting. Rockwool needs pH-adjusted water (5.5-5.8) for that soak or you’ll fight pH problems from day one.
- Leave humidity domes on. Keep them in place until seedlings touch the roof. Resist opening them early.
- Lower the light arm. Push it down closer to the pods, then reduce intensity to the lowest setting for the first week. Leggy sprouts from day one are almost always a germination lighting problem.
This article is part of my Hydroponic Troubleshooting Guide , a complete resource for countertop hydroponic growing.
Frequently Asked Questions
Do I need to test pH in a countertop hydroponic garden?
Yes. Target pH 5.8-6.3 for most countertop crops. Outside that window, plants can’t absorb nutrients regardless of how much you’ve added, which is why you get symptoms that look like deficiencies but don’t respond to feeding. Check at least twice a week once plants are actively growing, more often if you’re using third-party nutrients.
Can I use tap water in my hydroponic garden?
Tap water works fine if your baseline TDS is under 400-500 ppm and pH is under 7.5. Above those numbers, the mineral content and alkalinity will actively fight your nutrient solution, and you’ll spend weeks troubleshooting symptoms that trace back to the water source. Check your city’s water quality report online, or just test it yourself before the first fill.
Why aren’t my hydroponic seeds germinating?
Usually one of four things: humidity dome removed too soon, grow media wasn’t pre-wetted, light was too intense at germination, or temperature is below 65°F. Ideal germination range is 68-75°F. Try leaving seeds in the dark for the first 2-3 days, it helps germination speed for most varieties.
Can I grow tomatoes and herbs in the same hydroponic pod garden?
Not well. Herbs need EC around 1.0-1.5 while tomatoes need 1.8-2.5 or higher once flowering starts. A shared reservoir will always under-feed one or over-feed the other. Use separate systems, or wait until you have a second unit before adding tomatoes or peppers.
What nutrients should I use as a beginner?
Start at 50-75% of the recommended dose on whatever you’re using. More nutrients is not better, especially for herbs and seedlings. If you’re graduating beyond the OEM nutrients that came with your system, the General Hydroponics Flora Series see on Amazon (Grow, Micro, Bloom three-part) is the most consistently recommended starting point for growers who want more control. Mix FloraMicro first, always. And don’t use it at full label strength for basil, quarter-dose is the right starting point.
How often should I change the water?
Full reservoir change every 2-3 weeks for most countertop pod systems. Between changes, top off with plain water only. Adding more nutrient solution every time you top off is how you end up with salt buildup and burned roots. But if you’re tracking EC (and you should be), let it tell you when to dose, not the calendar.
The honest summary: most of these failures are boring and avoidable. Wet your media, leave the dome on, check your water before you fill, and measure EC before you dose. The grows where everything went sideways were almost never equipment failures. They were setup steps I skipped because they seemed unnecessary.
They weren’t.